Adding Overture Services
Stage
To add Stage to Ego:
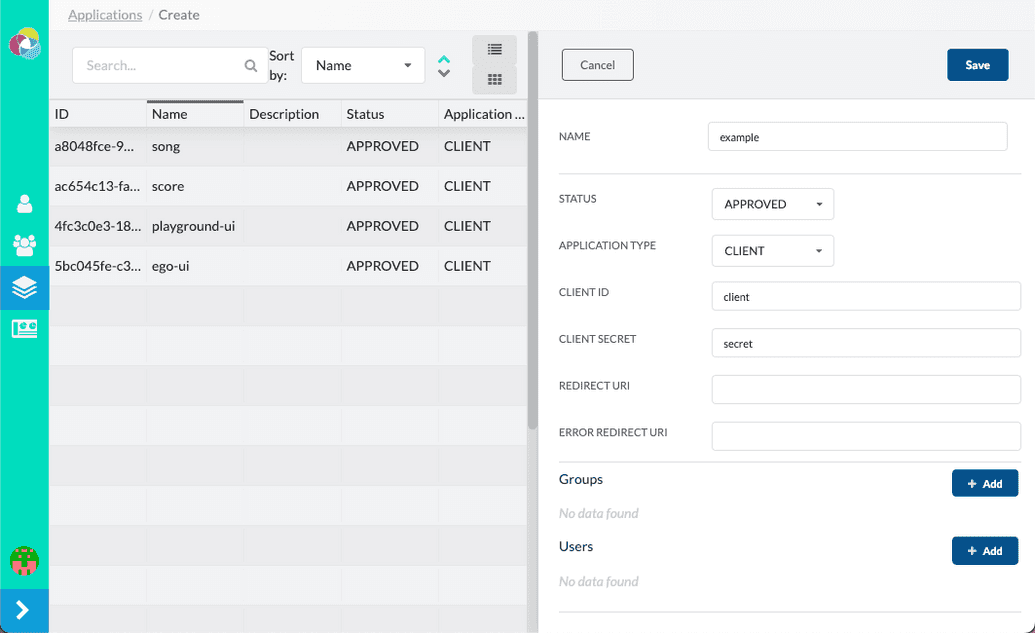
- Create a new application: From the Ego Admin UI's left-hand panel select Applications. From the Applications screen on the right-hand side click Create.
Insert the following information:
| Field | Value |
|---|---|
| Name | Stage |
| Status | Approved |
| Application Type | CLIENT |
| Client | Stage |
| Client Secret | Stage |
| Redirect URI | http://localhost:3000/api/auth/callback/ego |
| Error Redirect URI | http://localhost:3000/error |
You can leave the Groups and Users fields blank. Click the save button on the top right of the panel.
Create an environment variable file: Within the cloned Stage repository locate your
.env.stagefile, if you have not created one yet duplicate theenv.schemafile and rename it to.env.stage.Update environment variables: Variables within this file are already preconfigured for a local setup:
######### Ego# Auth providerNEXT_PUBLIC_AUTH_PROVIDER=egoACCESSTOKEN_ENCRYPTION_SECRET=super_secretSESSION_ENCRYPTION_SECRET=this_is_a_super_secret_secret# Base url for Ego APINEXT_PUBLIC_EGO_API_ROOT=http://localhost:8081# Ego registered app idNEXT_PUBLIC_EGO_CLIENT_ID=Stage
You will also need to update the NEXT_PUBLIC_SSO_PROVIDERS variable in line with the SSO provider(s) you have configured:
NEXT_PUBLIC_SSO_PROVIDERS=GOOGLE,GITHUB,ORCID,LINK
- Restart Stage: From the command line exit out (Ctrl/Cmd + C), and re-run Stage
npm run dev.
Once compiled you should be able to access Ego by clicking login on the upper right corner of Stage.
Song
To add Song to Ego:
- Create a new application: From the Ego Admin UI's left-hand panel select Applications. From the Applications screen on the right-hand side click Create.
Insert the following information:
| Field | Value |
|---|---|
| Name | Song |
| Status | Approved |
| Application Type | CLIENT |
| Client | song |
| Client Secret | songsecret |
| Redirect URI | N/A |
| Error Redirect URI | N/A |
You can leave the Groups and Users fields blank. Click the save button on the top right of the panel.
If the save button is disabled, provide an emply space " " within the Redirect URI and Error Redirect URI fields
- Update environment variables: Within your
.env.songfile, update the fields th following fields
| Field | Value |
|---|---|
| AUTH_SERVER_CLIENTID | song |
| AUTH_SERVER_CLIENTSECRET | songsecret |
Everything else remains the same (see example below)
# ============================# Ego Integration (Required)# ============================# Configuration for the secure profileSPRING_PROFILES_ACTIVE=secure# Ego authentication settingsAUTH_SERVER_URL={{ego-host-url}}/o/check_api_key/AUTH_SERVER_CLIENTID=songAUTH_SERVER_CLIENTSECRET=songsecretAUTH_SERVER_TOKENNAME=apikeyAUTH_SERVER_SCOPE_STUDY_PREFIX=song.AUTH_SERVER_SCOPE_STUDY_SUFFIX=.WRITEAUTH_SERVER_SCOPE_SYSTEM=song.WRITESPRING_SECURITY_OAUTH2_RESOURCESERVER_JWT_PUBLIC_KEY_LOCATION={{ego-host-url}}/oauth/token/public_key
- Create a new policy: From the Ego Admin UI's left-hand panel select Policies. From the Applications screen on the right-hand side click Create.
The policy fields appear in the right-hand panel. Populate them as follows:
| Field | Description |
|---|---|
| Name | Descriptive name for your policy |
| Groups | Use the + Add button to add existing groups and specify their access level (READ, WRITE, or DENY). To remove a group, click X next to the group. |
| Users | Use the + Add button to add existing users and specify their access level (READ, WRITE, or DENY). To remove a user, click X next to the user. |
 What is a Policy?
A policy defines the context within which an application may grant READ/WRITE/DENY permissions (Read, Write or Deny) to a user or group. For more information, see our user guide on Managing Policies
Score
- Create a new applciation: From the Ego Admin UI's left-hand panel select Applications. From the Applications screen on the right-hand side click Create.
Insert the following information:
| Field | Value |
|---|---|
| Name | Song |
| Status | Approved |
| Application Type | CLIENT |
| Client | song |
| Client Secret | songsecret |
| Redirect URI | N/A |
| Error Redirect URI | N/A |
You can leave the Groups and Users fields blank. Click the save button on the top right of the panel.
If the save button is disabled, provide an emply space " " within the Redirect URI and Error Redirect URI fields
- Update environment variables: Within your
.env.scorefile, update the fields th following fields
| Field | Value |
|---|---|
| AUTH_SERVER_CLIENTID | score |
| AUTH_SERVER_CLIENTSECRET | scoresecret |
Everything else remains the same (see example below)
# ============================# Ego Configurations# ============================# Configuration for the secure profileSPRING_PROFILES_ACTIVE=secure# Ego authentication settingsAUTH_SERVER_PROVIDER=egoAUTH_SERVER_URL={{ego-host-url}}/ego/api/oauth/tokenAUTH_SERVER_TOKENNAME=apiKey # Default: 'apiKey'AUTH_SERVER_CLIENTID=scoreAUTH_SERVER_CLIENTSECRET=scoresecret... # All subsequent variables remain unchanged
- Create a new policy: From the Ego Admin UI's left-hand panel select Policies. From the Applications screen on the right-hand side click Create.
The policy fields appear in the right-hand panel. Populate them as follows:
| Field | Description |
|---|---|
| Name | Descriptive name for your policy |
| Groups | Use the + Add button to add existing groups and specify their access level (READ, WRITE, or DENY). To remove a group, click X next to the group. |
| Users | Use the + Add button to add existing users and specify their access level (READ, WRITE, or DENY). To remove a user, click X next to the user. |
 What is a Policy?
A policy defines the context within which an application may grant READ/WRITE/DENY permissions (Read, Write or Deny) to a user or group. For more information, see our user guide on Managing Policies
